"Google Docs" is a service Google offers that allows you to create various types of documents, such as Work Processing documents, or Spreadsheets, and save them on Google's network.
Each of the programs runs in a web page. For example, if you want to create a Word Processing Document, you go to Google Docs, create new document, and start typing right there in the web page. The programs work pretty much the same as Microsoft Office, though they are a bit simplified. If you know how to work Office then learning Google docs will take only a few minutes.
Here are step by step instructions.
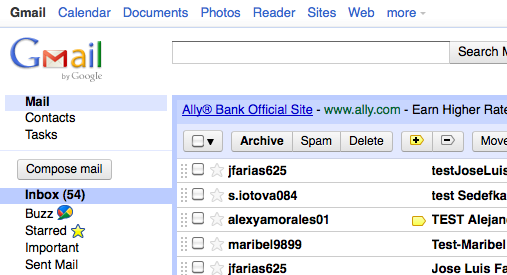
First, log into your Gmail account. You will need to know your username and password. This is why I ask all students to sign up for a Gmail account even if you have some other email such as Yahoo or Brand X Email. You will still need the Gmail account to get access to Google Docs.
Then, from Gmail, hit "documents" as shown near the top of this image:

That will take you to this screen:
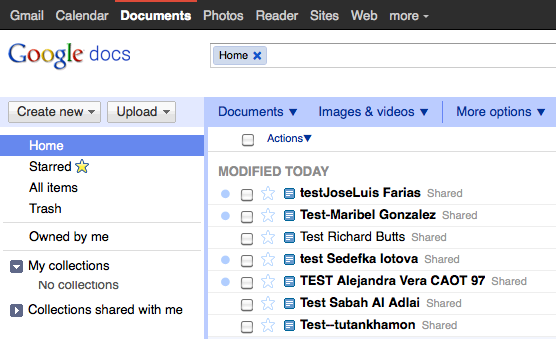
We will call this screen the "Google Docs Home Screen".
On the left side, we have some commands such as "Create New" and "Upload".
On the right side, we have a list of documents. The ones we see here are all "shared" documents, which means they are shared with another person. More about that later.
The search bar allows us to search the documents. Right now it says "Home" which means it will search our basic list of documents, which is the same list that you see here. You could type in something to search for. We can try that later.
From the Google Docs Home Screen, select "create New" and this menu will pop up:
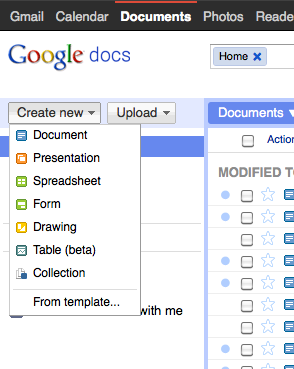
Select "Document". That will bring up thie new doc screen:
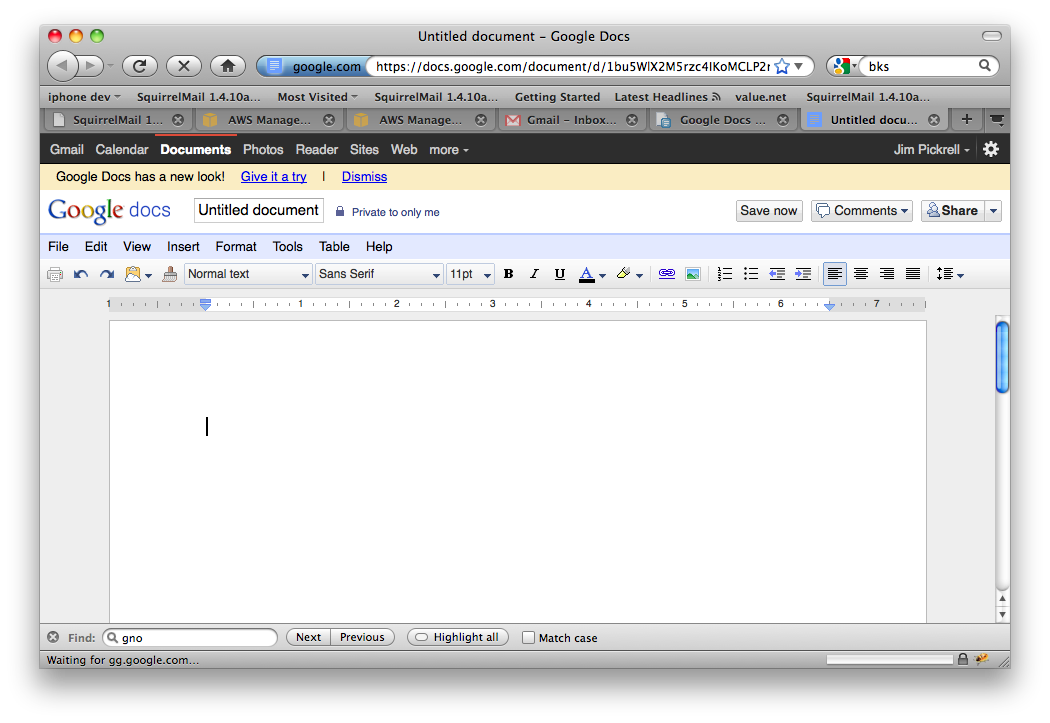
Let's enter some text.
Click in the middle of the text area, and type the following:
Jim Pickrell
This is some colored text.
This is some underlined and bold text
This is an example of Arial font size=24
This is an example of Times New Roman font size=24
This is an example of Courier font size=24
Be sure to use your own name, not mine, on the first line!
Now go through and set the font formats to match what is described.
To make some colored text, hilight (drag the mouse over) some text, then select the text color icon, which looks like a letter "A" with an underline. A color palette will come up, and you can choose your color. I chose blue for "some" and red for "colored".
To make text with a colored background, hilight some text, then select the texg background icon, which is supposed to look like a yellow hilighter pen. Choose the color you want. I chose purple for the word "text".
To underline, hilight some text and hit the U icon.
To bold, hlighty and hit the B icon.
To set a font face, find the font list. In the image above, it's labeled "Sans Serif". Select some text, and then set the fonts to match the descriptions. The size is next to the font name. We're going to set this to 18.
Note: the list of fonts will not be the same on all computers. The fonts listed should be available on windows. If you don't have "Arial", try "Verdana". If you don't have "Times New Roman", try "Droid Serif". They will look pretty similar.
Your final result should look like this:
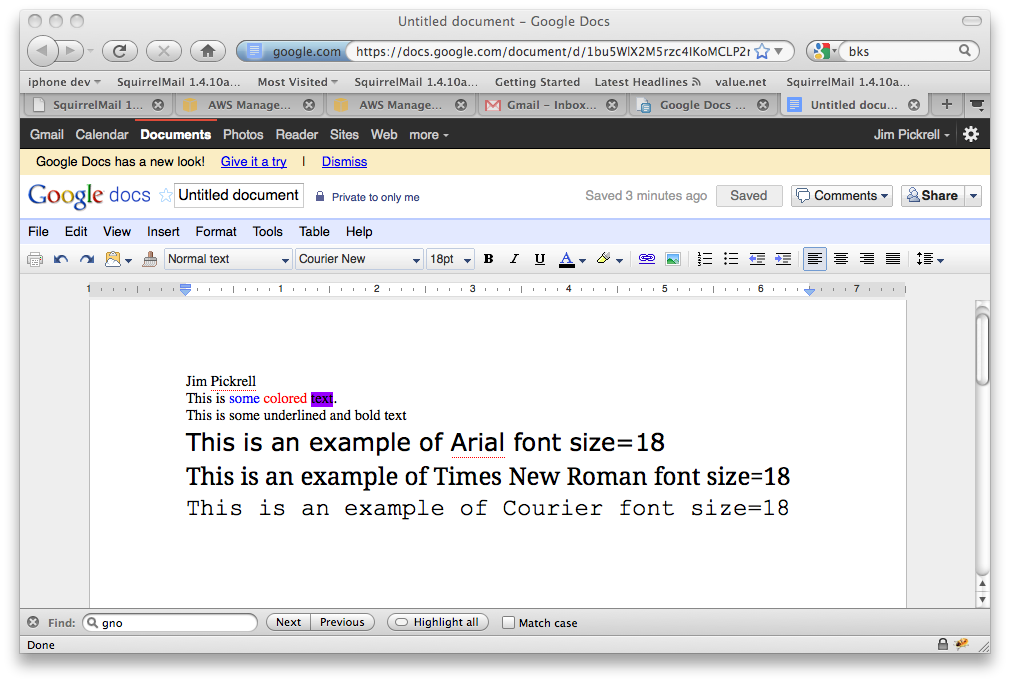
Please persist until your document looks like the image above.
The next thing we want to do is to save the document, but actually we don't have to. Google saves it automatically.
The thing we need to do is to set the name to something reasonable.
For purposes of this class, every document should have THE ASSIGNMENT and YOUR NAME. This is because we have lots of people who will be submitting documents in class, and I need to know who sent me what, without guessing. I done't want to get assignments with the name "Untitled document".
We're going to call this document "FIRST DOCUMENT" and my name is "Jim Pickrell" so up there where it says "Untitled Document" put the new name of the file. The name will come up next to the Google Docs logo.
OK, we have typed and saved a document. If this is a homework assignment, you're going to need to submit it. We do this by using the "Share" command which is found on the upper right of the screen. From "Share" select "Share". (Yes, I know, that's redundant, but I didn't write the program and this is what you need to do.)
This will bring up the "Sharing Settings" screen.
 There are a bunch of options you can set here.
Add the email address of the person you want to see your document, under "Add People". I added the president. Generally it will be good to add emails of people who have Gmail since they will have access.
"Can edit" controls whether the person receiving this document can make changes.
"Notifiy people via email" controls whether an email will be sent to the person receiving the document. I myself don't need to receive emails from you about documents since I will see them in my list anyway. But some other people might need emails if you send them documents.
When everything is done, click "Share and save" and the document will be saved and shared with the person you are sending it to.
On the recieving end, the other person will see your document in their file list. You can see what this looks like if you look at the image near the top of this page, which we saw when we first logged into Google Docs.
Remember to set sensible names for documents, or the person who is receiving them will think they are junk and throw them away!!!!